20 love is sweet: the bridal shower.

5.31.2010

I would consider the bridal shower this weekend a success despite some really hot and sunny weather!
Let's pretend that there isn't an umbrella in the picture above.  It was beautiful outside, but maybe a little too beautiful for the dessert table.  90-something degrees with no shade makes for a little melted chocolate...hence the umbrella.  Melted or not, I think the red, white, and aqua color scheme really came across well on the dessert bar!  The Jones soda really brought it all together I think.
We made an angel food cake covered in whipped cream and strawberries as the centerpiece.  It may or may not have sunk by the time we tried to cut it due to the sweltering temperatures.
I cut out some striped paper to line the plates with for a little extra color.  We also had red plates and aqua polka-dotted napkins!
The garland and banner were made using my Cricut and sewn together.  I love the way they looked against the white backdrop (which probably should have been steamed, but that just wasn't going to happen since we were running a little behind on time).
I put together some little vases of button mums and carnations for each table.
Here's the bride getting ready to test out the delicious chicken salad sandwiches my mom and aunt made!
We eventually had to bring everything inside when it was time for the gift opening.  At that point, the guests were starting to melt too.  But regardless of the heat, the bride was happy and that's really all that matters.  

The rest of the weekend was a little more relaxed but just as hot!  Good thing we spent most of it in a boat.  I hope you all had a nice Memorial Day!

12 pretty pillows.

5.28.2010

The only thing I managed to sew this week were some pretty pillows to coordinate with this baby quilt.
All made out of fabrics that are found in the quilt.
Two 14x14", one 18x18", and one 14x22" for Kelly's glider.
Now all that's left is the bumper!
I hope you all have a nice holiday weekend!  I'll be driving up to Michigan after work and praying that traffic isn't terrible.  I can't wait to relax and get in some much needed boating time.  It's supposed to be nice all weekend!  I'll be back next week to report on the bridal shower.

13 bake bake bake.

5.26.2010

That's all I've been doing so far this week!  I've been baking all of the desserts for the bridal shower I'm helping to host this weekend.  Here's a little sketch of what the dessert table will look like (hopefully).
First I made a double batch of red velvet cake pops, minus the "pop" because I realized I didn't have enough sticks.  
Thankfully they still taste just as good.  My husband says the stick just gets in the way of eating it all in one bite anyway.  He is the expert on that so I'll take his word for it.
Today I made sugar cookies.  With aqua royal icing and red nonpareils.  
It was my first time using royal icing, and wow did it make a royal mess in my kitchen.  I should have taken a picture of the icing puddle on my counter, but I'm not that good of a blogger.  I added more powdered sugar after the puddle incident and managed to actually get some frosting on the cookies.

Tomorrow I make peppermint meringues and white chocolate covered rice krispie treats.  I love rice krispie treats much more than any 26 year old should.  I'm waiting to make the chocolate covered strawberries for Friday night when I get back to Michigan so they're fresh for the shower on Saturday.  My mom is making the cake so that's one thing I don't have to worry about!  

And now I'm off to make some garland and bunting.  Sorry for the lack of posts this week...the baking will be over soon!

64 lovely designs: modern baby quilt.

5.23.2010

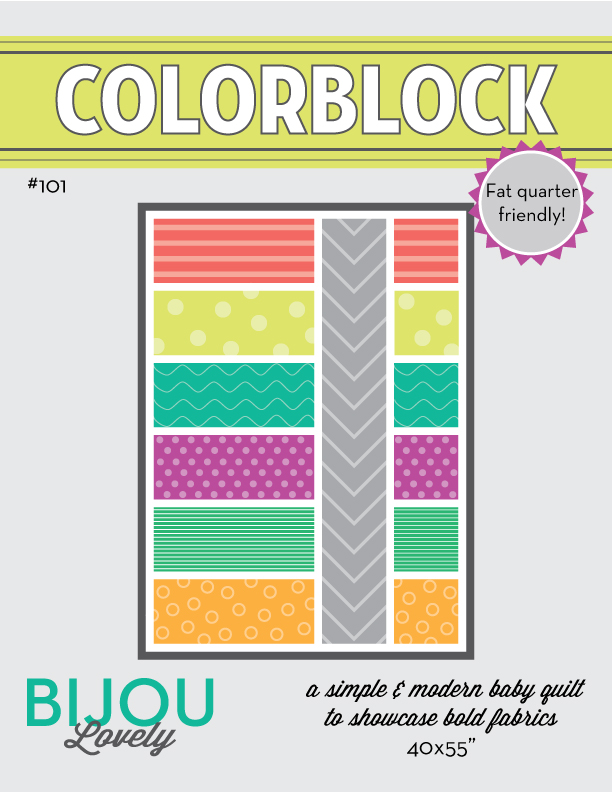
Update:  There is now a pattern available for this quilt!  Please visit my pattern shop to purchase the Colorblock Quilt Pattern!


A modern baby quilt for my friend Kelly at Blushink and her baby boy!

I can't take much credit for the design of this one, the fabric selection was a group effort (which include some fabulous Nicey Jane prints!), and Kelly came up with the design pretty much on her own.  I love how the vertical stripe looks intersecting the other blocks.
The back is just white flannel, but I think it looks pretty cool with all the straight line quilting!  I think I have a thing for gray bindings, it's basically all I ever use.
This quilt will coordinate wonderfully with the cribskirt, bumper, and pillows that I'm also in the process of making for the baby's nursery.
I hope you like your quilt Kelly!!
If you are interested in custom baby bedding, please contact me at bijoulovely@gmail.com.

39 blogger's quilt festival.

5.21.2010

This week is the Blogger's Quilt Festival hosted by Amy at Amy's Creative Side.  
I've decided to share my Little Folks Ruffle Quilt for this occasion because it's my favorite quilt that I've made so far.  
I had the idea of a ruffle quilt in my head for quite some time before I put this one together.  I was just looking for the perfect fabrics to come along when I discovered the Pastry Line fabrics for Anna Maria Horner's Little Folks line.  I thought the voile would be a great material to use for this quilt because it's lighter than regular quilting cotton so it wouldn't feel so bulky with all the ruffles.  The little scalloped stripes running across the fabric were just asking to become the lines to sew the gathers through to make the ruffles!  
I chose to make this quilt really colorful and I really like the colors I chose, but I think a monochromatic quilt would look beautiful too in order to really showcase the ruffles!  I'm sure I'll be making more of these in the future.

For the back I chose to use a mostly cream Kona cotton backing with one block of each color voile from the front surrounded in dark gray.  I love the look of the gray in this quilt with all the bright colors.  I chose to use a dark gray binding as well to tie it in to the back of the quilt.  
I straight line quilted using cream colored thread along the scalloped lines going across the front of the quilt.  The quilting blends in really well on the front since those same lines are where the gathers are for the ruffles, and it really stands out on the back, which I like.

Overall I was really happy with myself for coming up with this quilt design, especially since I had only made one quilt prior to this one!

Thank you Amy for putting on such a great event!  You can check out the rest of the quilts here!

12 love is sweet and so is winning!

My mom and I are throwing a bridal shower for my cousin next weekend back in Michigan.  I volunteered to be in charge of the invitations.  I wanted the shower to have a theme, and after seeing a cute red and aqua wedding shoot (which I'd link to if I could find it again) held in a candy store recently, I thought the theme "Love is Sweet" would be a fun!  The red, white, and aqua will also be pretty festive without being overly patriotic since it's going to be held on Memorial Day weekend.  Here are the invitations I designed and printed for the shower.
I cut the envelope liners out of aqua polka dotted paper from PaperSource, which is where the envelopes are from as well.  The actual invitation is printed on white cardstock and attached to red metallic cardstock from the same store.

The fonts I used are both free fonts, Candy Randy for the blue letters and Honey Script for the red.
They came together pretty quickly, it only took me one night to print and assemble them all!  


I've got a plan in the works for a dessert bar at the shower, so I've been trying to channel my inner Amy Atlas.  I think I know what I'm going to make, now I just have to go on a baking spree next week to have it all ready in time!  I also have to make the decorations, which I don't think will be too difficult!  Hopefully the "Love is Sweet" theme won't be too cheesy and my cousin will like it!!


Oh yes, and now onto other important sweetness.  The giveaway winner is...
bethany, who said "dude that is awesome. Okay I will put the surfer dude away. Thanks for the giveaway that is really neat."


Congrats Bethany!  I'll be sending you an email soon!


Thank you to everyone who entered.  I had so much fun reading all of your comments!  For all of you who stopped by from Sew, Mama, Sew...I hope you'll stick around!

98 the market tote tutorial.

5.20.2010

So tomorrow I'll announce the giveaway winner, but today, everyone wins!  Want to make your own market tote?  Now you can!

You will need:
1 yard main/outer fabric (I use good quality quiting weight cotton, but you could use home decor weight fabrics for a stiffer bag.)
1 yard base/lining fabric (I use linen, but canvas or home decor weight fabric would work too)
3.5 yards (4 to be safe) very lightweight interfacing (I use Pellon JAS Val-U-Fuse 44FPKG10)
Matching thread
Contrasting thread (for topstitching)

1.  Start with your main fabric.  Fold your fabric in half from selvedge to selvedge.  Cut two 19" x 21" pieces and two 2" x 21" pieces.  Pay attention to the direction of the pattern if you are print fabric.  The 21" will be the width of your bag, the 19" will be the height.
2.  Fold your base/lining fabric in half from selvedge to selvedge.  Cut two 19" x 21" pieces, two 9.5" x 21" pieces, and two 2" x 21" pieces. Again, pay attention to the direction of the pattern if you are print fabric.  The 21" will be the width of your bag, the 19" will be the height (and for the base the 9.5" is the height).

3.  Cut your interfacing.  You will need to cut four 21" x 19" pieces, two 21" x 9.5" pieces, and four 2" x 21" pieces.

4.  Now we're done with cutting!  Check to make sure you have all your pieces.

5.  Iron the interfacing to the wrong side of each piece (both main/outer fabric pieces and base/lining fabric pieces).
6.  Trim the excess interfacing off of each piece to square them up.  
7.  Place one main bag piece right side up with the width (21" side) horizontal.  Place a base (9.5" x 21") piece wrong side up on top of the main piece, with the bottom edge of the base 8.5" from the bottom of the main bag piece.
8.  Pin base onto main bag piece.  Repeat with other base and main bag piece.
9. Using your matching thread, sew along the pinned side of the fabric with a 1/2" seam allowance (you can use the side of your presser foot it that's easier for you to sew a straight line against).
10.  Flip base fabric right side out over the main bag piece and press.  Repeat with other side of bag.
11.  Using your contrasting thread, topstitch along the top edge of your base fabric, lining the seam up with the edge of your presser foot.  You might want to increase your stitch length to do this (my stitch length is set at 3 when I topstitch).
12.  Topstitch again using a 1/4" seam allowance below the first row of topstitching.
13.  Repeat steps 11-12 on the second outer bag piece.
14.  Pin both outer bag pieces with right sides together.  Make sure to align the base panel seams.


15.  Using your matching thread, sew around the sides and bottom (not the top) of the bag using a 1/2" seam allowance.  I actually sew around the three sides twice to make it extra strong.

16.  Pin lining pieces right sides together.


17.  Sew sides and bottom using a 5/8" seam allowance, making sure to leave an opening at the bottom for turning.
18.  Press seams open on outer bag and lining.


19.  Now it's time to make the box pleats.  Pull the fabric at one of the corners of the main bag so that the side seam and the bottom seam are on top of each other.  Align the seams and pin.  Measure 3 1/2" down from the peak and draw a line perpendicular to the seam.  The line should be 7" long.


20.  Using your matching thread, sew along the line you drew, making sure to backstitch at the ends.  It might be a good idea to sew a couple times along this line for extra strength.  (Ignore the line on the right in my picture, measured wrong at first.)

21.  Repeat step 19 on your lining corners, except measure 3 1/2" down from the peak and draw your line across.  The line should measure 6 1/2".  Repeat step 20, again sewing across the seam multiple times for extra strength.
22.  Cut the corners of both the outer bag and lining 1/2" from the seam you just made.

23.  Place one lining and one main fabric handle piece right sides together and pin.  Repeat with the second set of handle pieces.
24.  Using matching thread, sew along the long sides of each handle using a 1/4" seam allowance.
25.  Turn the handle tubes right side out.
26.  Flatten and press each handle.
27.  Using constrasting thread, topstitch along the long sides of the handles using a 1/4" seam allowance.  Topstitch again 1/4" from the first topstitched line.
28.  Place one of your handles inside of the lining and place each end 5 1/2" from the outer edge of each side of the bag with the lining side of the handle facing the right side of the bag lining.  Align the top edge of each side of the handle with the top edge of the lining.  You should have approximately 5" between the inner edges of the handles.   Repeat with the other handle on the other side of the bag.
29.  Place your outer bag inside of your lining so the right sides of the outer bag and lining are together.
30.  Start pinning the tops together by aligning the side seams with each other.
31.  Continue pinning all the way around the bag.
32.  Using matching thread, sew completely around the top of the bag using a 1/2" seam allowance.  You can sew around this seam multiple times for extra reinforcement.
Pay special attention to where the handles are located, sewing a few extra rows of stitches on top of the handle within the seam allowance.
33.  Turn bag right side out through the opening in the lining.
34.  Align the corners on each side in the bottom of the bag, and pin the outer bag and lining together at the top seam.

35.  Using contrasting thread, topstitch along the top seam of the bag, aligning the edge of your presser foot with top of the bag.  Topstitch again 1/4" from the first topstitched line.
36.  Slipstitch the opening in the lining closed and press your finished bag.


That's it!  Enjoy your new market tote!  (Finished totes are 13" wide x 14" high x 7" deep).
This tutorial is for personal use only.  Please do not use this tutorial to make items to sell.
Related Posts with Thumbnails
 

Blogging tips