9 improv mini quilt.

1.30.2012

I spent so much time sewing this weekend! It felt great to start crossing things off of my endless list of WIPs. My first finish was this improv mini quilt, made from the block I made during the Improv Sewing class at Sewing Summit.  This one had been basted for awhile, but I had started pebble quilting it and it just didn't look right. So it sat for a long time waiting to have the quilting ripped out. That part wasn't fun at all, but it was really easy and fast to finish once I had spent some quality time with my seam ripper.
I used a thrifted purple shot cotton for the sashing, and I am really sad to say that I'm almost out of this fabric!  It's got great texture and I love the look of the graphic stripe.
I quilted this in wavy lines using yellow Aurifil thread.  It was my first time using Aurifil thread and I can say that I'm officially hooked.  It makes such a difference, and my stitching turned out beautifully.
I used a Denise Schmidt print from JoAnn's for the backing, and a black pindot for the binding.  I wish I knew who made this print, I'm almost out and I want to buy more, it's so versatile!
I handstitched a little heart on the quilt using a hot pink Cosmo floss, just for fun.
This one is hanging up in my sewing room!  I'll probably move it to another wall once I finish another project I just started... a framed pegboard to hold all of my sewing tools and ribbon.  We bought the supplies for that last night so hopefully I can finish it sooner than later.  I have a bare wall that needs a little love!
I'm looking forward to posting more of my finishes this week!  Hope you're having a great Monday.

7 quick sewing.

1.23.2012

I haven't really been too inspired to sew recently, but yesterday I was in the mood for a quick and easy instant gratification type of project.  Something I could finish in one short little session to remind me how good it feels to finish a project!  This lined drawstring bag using Jeni's tutorial was just what I needed.
I used Lizzy House's Pearl Bracelet print in Green from the 1001 Peeps collection for the exterior.  I'm currently obsessed with this color!  The black and white dot prints are just random fat quarters I had laying around, not sure who they're by.  The ribbon is a Martha Stewart faux bois ribbon I bought at Michael's a really long time ago.
 I'm traveling again this week and needed a bag to hold my current knitting project (another honey cowl).  This bag will work perfectly!
This bag was so fun and fast to make I have a few more already planned.  I think they'll make really cute gifts for Valentine's day.

11 another kind of stitching.

1.18.2012

Yep, I've caught the knitting bug.  It started shortly after Sewing Summit.  After seeing all the pretty honey cowls being stitched up there, I wanted to make one myself.  And well, one turned into three, and now I can't stop.
This is the one I just finished, a late Christmas gift for my sister-in-law.  I gave the other two away without taking proper pictures, other than a few Instagram shots.


  I love how cuddly and warm these cowls turn out when they're finished.

Here's the one I just started this week for myself.  It's an alpaca/wool blend that I got from a local alpaca farm/yarn shop called Rainbow Yarn & Gifts.  The color is lemon chiffon, it's kind of like a citron-y yellow.

Here's my little furry alpaca friend I met at the farm.  Isn't he the cutest?
It's nice to have a yarn store in the area, I'll definitely be visiting again.  I might have to pick another pattern to work on soon so I can learn a few more stitches and have an excuse to buy more yarn!
Any recommendations for what I should knit next?  I'm thinking one of these herringbone cowls would be fun to try!

35 colorblock quilt.

1.17.2012

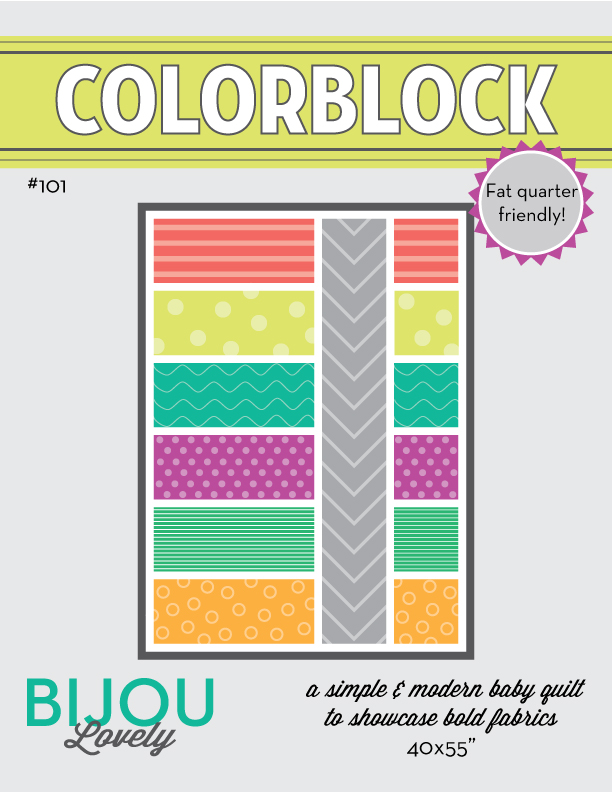
Update:  There is now a pattern available for this quilt!  Please visit my pattern shop to purchase the Colorblock Quilt Pattern!

I finished my first quilt of 2012 last week!  It's a repeat of the baby quilt I had made for Kelly awhile back, but this one is for a little girl.
 I have had a lot of requests for a pattern for this quilt, so I'll be releasing one within in the month or two.
I love the colors in this one, girly but with a little bit of an edge to it.  The kelly green really pops in the chevron stripe.
  I quilted this one the same way I did the boy version, with straight lines parallel to each block.
 The back is a lime gingham, and it's bound in my favorite gray, Kona Ash.
For the pattern, which sizes are you interested in?  This is a larger baby quilt, about 42" x 55".  Should I include a lap size and twin size as well?  I'd love to hear your thoughts on size, as well as any other input on what you like/dislike about quilt patterns!

9 master bathroom plan.

1.04.2012

I mentioned a few weeks ago that we were planning to renovate our master bathroom.  We started it the day after Christmas, and it's definitely still a work in progress.  But I thought I'd share a little bit about what we're planning to do in there while it's happening.

Here's what the bathroom looked like before.  This is the view from the doorway, and as you can see, even though it's actually a good sized bathroom, it looks pretty small here because of the linen closet that juts out on the right and the shower that sticks out into the room.
 Here's a better view of the linen closet.  It completely ate up the open space along the vanity wall.
 Here's the view of the shower and tub.  Not horrible on this side, but we really disliked the bisque colored shower, tub, and tile.
Here's another view of the vanity wall.
Here's the view from the wall near the shower looking towards the bedroom door.  It bothered us that the door favors the tub wall, and it's even more of a problem from the bedroom since the bedroom and bathroom doors overlap each other (so if the bedroom door is open, it blocks the bathroom doorway).  Also notice the randomly spaced light switches at different levels along the left hand side.
Another thing that you can't see in these pictures is the condition of the walls.  There was previously wallpaper in this room and it had since been removed and painted over, but there must have still been a lot of glue on the walls when they painted because the paint was all cracked and chunky on the walls, with some moisture spots since they used the wrong kind of paint.  It would have taken us forever to repair them enough to repaint!

Now that you've seen what we've got to work with, here's the new floorplan.
And here's everything we're using in it.


Let's start with the shower.  We've ripped out the shower surround, the wall framing it in, and the tub and surrounding tile, so the entire left side of the room is a completely open space.  That entire wall and a portion of the side walls will be tiled in 2x4" white subway tile with gray grout.  The floor will be tiled in 1x2" honed carrara marble herringbone tile (also with gray grout).  There will be a frameless glass door (with the actual door opening in the center) similar to the one in the picture above, and inside the shower area will be two shower systems, and a bench made of the herringbone tile along the entire back wall.  Here's a sketch of what the shower will look like when standing directly in front of it.
The showerheads will each come out from an arm in the wall (they're rain showerheads) and there will be a built in square storage area of the herringbone tile to store shampoo, etc.  Glass shelves will line the center of the back wall for towels, etc.  Each shower will have a recessed light above it as well.

Now onto the vanity wall.  The vanity is this one, which we bought on Overstock.  It has an espresso finish with a carrara marble countertop and chrome faucets.  The mirror came with the set as well.  We'll be using these pendant lights from Restoration Hardware above each sink.  We're using the same Kohler toilet we used in the first floor bathroom since we've had good results with it.  There will most likely be shelves above the toilet for additional storage since we removed the linen closet and medicine cabinet from the room (we do have another linen closet down the hall though).  We'll fill the shelves with baskets to hold our things so they don't look too cluttered.  There will be some type of white wainscoating along the bottom of the untiled walls, and the top of the walls will be painted a light gray.
There you have it, our plan for the bathroom.  Of course right now it looks nothing like the final  renderings, but I'll share our progress in another post since this one is getting long!

4 happy 2012.

1.03.2012

I'm a few days behind but happy 2012! I hope you all had a wonderful time during the holidays. I've been on vacation since December 20th, so it's a little sad to go back to work today. Here's a little taste of what I did with my time off...

Turned 28.
 Finished Christmas shopping and wrapping.
Visited with friends and family.
Attended and hosted a few Christmas parties.

Ate (way too much) good food.

Started our master bathroom renovation.


Rang in the New Year (with sparkly nail polish, of course!).

Read a couple books (The Hunger Games and Catching Fire, this series is amazing).

Did a little sewing...
 knitting...
 and quilting.
So that was my time off in a nutshell, mostly through Instagram pictures.  My username is bijoulovely in case you want to follow me there.
Related Posts with Thumbnails
 

Blogging tips